Happy Australia Day to you!
Following on from my previous posts (check them out before continuing) – this article assumes you have followed steps outlined in the previous posts to create various models and accounts etc.
|
Now we should have a working data model which has been created in your SQL Azure (Cloud) database. Taking lessons learned from Part 2, we’re going to create an Entity Framework (v4) model of the SQL Azure tables using Visual Studio 2010 Beta 2.
This entry is sort of a rehash of the first and second entries, but the outcome should provide you with a fully functioning Entity Framework (v4) data model, and a Unit Test to prove it works!
Creating the Model
Fire up Visual Studio 2010 (Beta 2). Next use “File –> Project..” and choose a new Class Library. You can name the new Library whatever you like, but I will be calling it SQLAzure.Application.DataAccess as you can see in the following screen shot:

Now, the first thing I do when I create a new solution or project is to add a corresponding Unit Test project, so we can code out some Unit Tests as we implement new functionality. Let’s do that now.
If you can’t see it, the Solution node in the Solution Explorer can be set to “Always Visible” by going to “Tools –> Options”, “Projects and Solutions” and check the checkbox next to “Always show solution”.


Now, right click the “Solution” in Solution Explorer and select “Add New Project”. You want to select a new Test Project (select the Test node under the tree list on the left hand side). I’ve called my test project SQLAzure.Application.DataAccess.UnitTests. Once added, right click on the “References” solution folder and select the DataAccess project. You’ll also need to add a reference to System.Data.Entity.
Now, let’s delete those default files added to the projects (Class1.cs and UnitTest1.cs) which should leave us with a fairly vanilla solution, like so:

Now let’s configure that Data Model! In the DataAccess project, right click and “Add –> New Item..”. Select “Application Configuration File” then press “Add”.
Note that the file opens in the Text Editor after it has been added. Copy and paste the following code between the <configuration> tags, then replace the items in bold with the proper values for your SQL Azure database:
<connectionStrings>
<add name="SqlDataModelContainer" connectionString="metadata=res://*/SqlDataModel.csdl|res://*/SqlDataModel.ssdl|res://*/SqlDataModel.msl;provider=System.Data.SqlClient;provider connection string="Data Source=[servername].database.windows.net;Database=Vinyl;Uid=[user]@[servername];Pwd=[password];""
providerName="System.Data.EntityClient" />
</connectionStrings>
Next, on the DataAccess project, right click “Add –> New Item..” and select “Data” from the left hand tree. Name the file “SqlDataModel.edmx” and click “Add”. On the next screen, select “Empty Model” and then click “Finish”.

A blank model will open in the editor. Now, assuming you’ve followed all these steps correctly, you should be able to right click the model and select “Update Model from Database…”.
You should find yourself looking at the “Update Wizard”’s “Choose Your Database Objects” window. If you are not, it means your App.Config probably has incorrect values. Refer to my first post for how to fix any issues you may encounter.


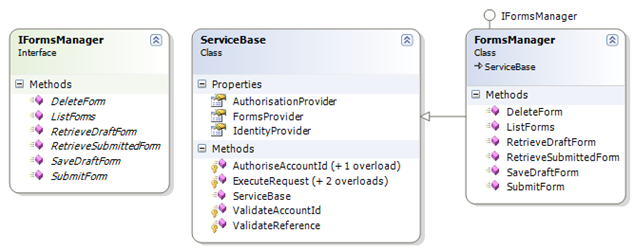
Select all the Tables in this dialog and click “Finish”. Barring any unexpected errors, you should now be looking at a fully articulated Entity Framework model of the schema we previously created and populated in SQL Azure.

Save the file and close it.
Verifying it all works!
Now, right click on the UnitTests project and select “Add –> New Test..” and select a “Unit Test”. I typically add a “Smoke Test” set of tests which look for basic connectivity and authentication. You can see from the following screen capture:

Next, remove all the template generated plumbing (you won’t need it for these basic tests, and rename the initial test to be now called “BasicDataAccessTest”, as follows:

Now, we’re going to need to add a config setting. We’re going to add a link to the App.Config file you created under the DataAccess project. Right click the UnitTests project and select “Add –> Existing Item..”. Browse to the App.Config file under the DataAccess project (you may have to change the file filter to “All Files (*.*)” to see it). Instead of clicking “Add”, click on the little downwards arrow on the Add button and select “Add As Link”.

Now, a reference to the DataAccess’ App.Config exists, thus no need to duplicate the connectionString settings across multiple projects, just one config for all.
Next, copy the following code into the body of the BasicDataAccessTest function (you will need to add “using System.Diagnostics;” at the top of the file): (apologies for a lack of colouring)
[TestMethod]
public void BasicDataAccessTest()
{
using (SqlDataModelContainer e = new SqlDataModelContainer())
{
var albumsCount = (from a in e.Albums
select a).Count();Trace.WriteLine(String.Format("Total records found: {0}", albumsCount));
}
}
Now, click on the Test menu and select “Windows –> Test View”. You might need to click the little “Refresh” button to see the renamed Test Method.


The proof is in the pudding
Assuming you’ve followed all the steps thus far, you should be able to successfully run this test now. If you double click on the test result, you should see the following:

If you haven’t managed to get this test to pass, then you must have some problems with your configuration. R
e-read this entry and you should manage to have it all wired up correctly. Please drop me an email (rob.sanders [at] gmail.com) if you encounter any issues, I’m more than happy to try and help.
Conclusion
Now, assuming you have achieved success in wiring up this simple Unit Test, you have a working data model and working SQL Azure database instance. Congratulations!
In my next article, I’ll show you some of the more complex queries we can perform, as well as begin to introduce you to some of the amazing functionality which is now available to use, because you have a working Entity Framework (v4) data model.
Check back soon for the next entry.